Frequently Asked Questions
Getting Started Questions
I just received my AIR-T. What should I do now?
- First, register your system with Deepwave to gain access to our Developer portal which gives you access to software downloads and the ability to submit support tickets. To register your system, login to the Developer Portal and click "Confirm Purchase."
- Second, we would recommend that you update to the latest version of AirStack. Once you have registered your hardware you will be granted access to your software downloads. You can compare the version of AirStack running on your AIR-T to the version that is available to you in the Developer Portal. See the following FAQs for more details:
- "How do I download the latest version of AirStack?"
- "How do I determine my AirStack Version?"
- "How do I upgrade AirStack on my AIR-T?"
- Next, we recommend that you work your way through our extensive tutorials. These will help you become familiar with our API.
Where can I find the performance parameters of my AIR-T
Check out the Product Guide for your AIR-T model. This will be located under the AIR-T tab on this documentation site. You can also print useful information about your radio using the SoapySDRUtil --probe command on the AIR-T.
What is AirStack?
AirStack includes all the components necessary to utilize the AIR-T, such as an Ubuntu-based operating system, AIR-T specific device drivers, and the FPGA firmware. The operating system is based off of NVIDIA JetPack SDK and is upgraded periodically.
How do I determine my AirStack Version?
To determine which version of AirStack you are running:
- Login to your AIR-T
- Press ctrl-alt-T to open a terminal
- Type
SoapySDRUtil --find
The output should display the installed drivers for all of the software subsystems:
$ SoapySDRUtil --find

######################################################
## Soapy SDR -- the SDR abstraction library
######################################################

Found device 0
  driver = SoapyAIRT
  driver_version = 0.5.5
  firmware_version = 0.5.4
  fpga_driver_version = 0.5.4-1
  hardware = AIR8201
  rf_api_version = 0.5.4
  url = https://www.deepwavedigital.com
  vendor = Deepwave Digital, Inc.
AirStack Installation Questions
How do I download the latest version of AirStack?
Customers with an active support and maintenance subscription may download the latest version of AirStack from our Developer Portal.
Every AIR-T purchase includes 1 year of software updates which will always be available to you on our developer portal. In order to access your software downloads you will need to login to the Developer Portal and click "Confirm Purchase." Once your hardware has been registered in our system, your software downloads will appear in the "Software Downloads" section of the Developer Portal.
How do I upgrade AirStack on my AIR-T?
We have detailed instructions on how to upgrade AirStack on your AIR-T. Most AirStack updates are distributed as Debian packages (.deb files); however, major upgrades that involve a new Ubuntu version or kernel change will require the user to perform a full AirStack OS Install. Typically, a change in the AirStack version that updates the second number (e.g., 0.4.2 to 0.5.0) requires a re-imaging. You can always look at the release notes to see if re-imaging is required. Additionally, it is always a good idea to check if FPGA firmware was included in your updated AirStack download.
I cannot re-image my AIR-T. What can I try next?
- First, ensure that you are properly following the steps in our detailed tutorial here. Skipping any step will result in failure.
- Make sure that you are able to communicate with the AIR-T via the micro-usb connection. See the details here.
- If you have tried to flash your AIR-T and it failed, you must reset it and then go back into recovery mode prior to trying to flash again.
- Make sure that you have the proper version of AirStack downloaded for your hardware. For example, you cannot flash the AIR8201-B with the version of AirStack intended for the AIR7101.
I get "probing the target board failed" when trying to re-image my AIR-T
- Make sure that your AIR-T is in recovery mode prior to flashing. See the instructions here for placing your AIR-T into recovery mode.
- Not all micro-usb cables are created equal. Ensure that you have a high-quality micro-usb cable. We have had good luck with the Anker Micro USB to USB-A cable (Manufacturer P/N: AK-B7116091).
- Installation of the TLP package for Linux (on the host computer) is known to produce this issue. Try removing the TLP package on the host computer with the command:
sudo apt remove tlp[ref]. - There have been instances where some USB-C only laptops have not been able to properly see the target board. It may be necessary to try a different host computer.
Can I use a Windows host computer to re-image my AIR-T?
Yes! Windows users can re-image the AIR-T using WSL. See the instructions here.
3rd Party Software Support Questions
How do I install ML frameworks on the AIR-T?
We recommend using conda for all custom installations on the AIR-T. This allows users to create custom Python virtual environments without the danger of modifying the underlying drivers of the AIR-T embedded system.
- We provide a step-by-step tutorial on using conda on the AIR-T here.
- If you wish to use a newer version of python, or integrate common ML frameworks (such as PyTorch), we provide multiple anaconda environment files on our GitHub here.
Take special care in reading the versioning notes before manually upgrading packages to ensure that what you are trying to accomplish is recommended.
How do I install GNU Radio on the AIR-T
The supported method to install GNU Radio on the AIR-T is using the conda channels. For a tutorial, see this webpage.
What versions of GNU Radio are supported?
GNU Radio is supported for version 3.9.1+ via conda. There are a few reasons that early versions of GNU Radio are not supported:
- GNU Radio is moving to using conda environments for installation. GNU Radio began creating conda installers with GNU Radio version 3.8.0.0.
- Installation of GNU Radio for ARM via conda is not supported for versions prior to GNU Radio 3.9.1.
How do I upgrade the AIR-T to a newer version of CUDA?
The AIR7101, AIR7201, and AIR8201 models of the AIR-T support up to NVIDIA JetPack 4.6. JetPack 4.6 is embedded with CUDA 10.2. Updating beyond CUDA 10.2 will not go well and will likely lead to having to completely re-image your hardware. It is not supported.
What other open source tools does the AIR-T support?
You may view a list of the most common FOSS tools for the AIR-T on our Open Source tab. The AIR-T will support many other open source APIs if those APIs support the version of NVIDIA Jetpack running on your AIR-T.
Additionally, common FOSS tools for Jetson may be found at the Jetson Zoo.
When I try to install something via apt-get I get a telegraf key signing error?
If you run apt-get update and get the following error:
The following signatures couldn't be verified because the public key is not available: NO_PUBKEY D8FF8E1F7DF8B07E
Reading package lists... Done
W: GPG error: https://repos.influxdata.com/ubuntu bionic InRelease: The following signatures couldn't be verified because the public key is not available: NO_PUBKEY D8FF8E1F7DF8B07E
E: The repository 'https://repos.influxdata.com/ubuntu bionic InRelease' is not signed.
N: Updating from such a repository can't be done securely, and is therefore disabled by default.
N: See apt-secure(8) manpage for repository creation and user configuration details.
then you need to update the key for telegraf on your AIR-T. Enter the following commands to get the new key:
wget https://repos.influxdata.com/influxdata-archive_compat.key
sudo apt-key add influxdata-archive_compat.key
Other Questions
Where can I find more information about the SoapyAIRT API?
SoapySDR is the primary API for interfacing with the AIR-T's transceiver. AirStack's SoapyAIRT driver is a SoapySDR plugin for the Deepwave hardware. Both SoapySDR and SoapyAIRT are included in AirStack.
SoapySDR is an API and runtime library written in C++. Bindings to the C++ API exist for many other programming languages including Python, GO, Rust, Julia, and others.
I receive a "SoapySSDPEndpoint" error when starting the radio
For some versions of AirStack, you will receive the following "Error" which should actually be a warning:
[ERROR] SoapySSDPEndpoint::sendTo(udp://[ff02::c]:1900) = -1
  sendto(udp://[ff02::c]:1900) [99: Cannot assign requested address]
This is not an error. One of the Soapy plugins (to allow the AIR-T to be controlled over a network) is not configured for your network. This message does not affect the AIR-T functionality.
Why am I getting driver errors / my data doesn't look right?
The first thing to check is to make sure that the AirStack drivers are properly installed. If the firmware version does not match the driver version, you will experience technical issues. To check the installed driver versions, follow the procedure in How do I determine my AirStack Version?.
I have no connectivity to the Radio
-
Ensure that you are able to see the Xilinx FPGA on the PCIe bus:
should return:$ lspci00:01.0 PCI bridge: NVIDIA Corporation Device 10e5 (rev a1) 01:00.0 Serial controller: Xilinx Corporation Device 7024 -
Ensure that the FPGA DIP Switch (SW4) is set to
0, 0, 1as shown in the figure below.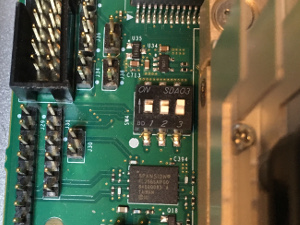
How do I enable WiFi / Bluetooth
The AIR-T has WiFi and Bluetooth capability that is supported through the NVIDIA Jetson TX2 module. To use these features, you must purchase an after-market antenna and cables. Since the system is MIMO capable, two antennas are required.
Required Parts
- An AIR-T with enclosure
- Antennas (x2): 2.4/5/8 GHz Dual Band, Pulse Electronics W1043, Purchase
- Cables (x2): U.FL mini to RP-SMA, Linx Technologies CSJ-RGFB-200-MHF4, Purchase
Instructions
- Open the AIR-T enclosure by removing the screws on the feet and sliding out the housing.
- Connect the cables to the Jetson module as shown in the photo below.

- Remove the nut and washer from the cable assemblies and route the cables to the WiFi / Bluetooth through holes on the back of the AIR-T enclosure. Place the washer on the RP-SMA connectors and tighten the nuts.
- Connect the antennas to the RP-SMA connector on the enclosure.
- Reassemble the enclosure and boot the AIR-T.
- Enable WiFi and/or Bluetooth in the network manager settings.
Can I program the FPGA with my own IP Cores?
Yes! This requires a license to AirStack Sandbox. Please reach out to our team to find out more. Contact Us
I need the serial number and it isn't printed on my enclosure
- Turn over the AIR-T and use a phillips head screwdriver to remove the 4 screws shown in the left figure below.
- Remove the aluminum spacers by sliding them out of the feet as shown in the middle figure below.
- The serial number of the unit is printed on the white sticker, as shown in the right figure below.

None of this was helpful for my issue. How do I submit a support ticket to the Deepwave team?
First, please read through all of these FAQs to make sure that we have not already answered your question here.
Second, the search feature on this site works really well! Please try first searching for a few key words that describe your issue and see if we cover it somewhere else in our documentation.
Third, if you still require assistance, you can log in to our Developer Portal and submit a support ticket. If you have not already registered your AIR-T serial number with us, you will be asked to do so prior to receiving support.