Receiving Samples with Rust
![]()
In this tutorial we show you how to perform basic functionality with the AIR-T using Rust. You will learn how to interact with the AIR-T radio drivers, stream signal data from the radio to the Jetson, and create a one-time plot of the wireless spectrum. The AIR-T does not come preloaded with rust, so you will need to install it yourself first. The recommended solution is to install it in a conda environment. Below you will find the steps to install and the source code.
Installing Rust on the AIR-T
- Install rust using conda with the environment below. You will need to save this to a file called
rustenv.yml:name: rustenv channels: - conda-forge - defaults - file://opt/deepwave/conda-channels/airstack-conda dependencies: - rust - soapysdr-module-airt - clang - libclang - soapysdr - llvmdev - pkg-config - Once you have saved the
rustenv.ymlfile, open a terminal on the AIR-T and type the following command to create the conda environment:conda env create -f rustenv.yml -
Activate the rust conda environment:
conda activate rustenv -
To verify your installation, activate your conda environment and then run the commands below:
rustc --version
cargo --version
Rust Code
- Set up a new project in rust using cargo:
cargo new hello_world -
Add the following packages to your cargo.toml file:
[dependencies] num-complex = "0.4.3" soapysdr = "0.3.2" plotly = {version = "0.8.3", features = ["plotly_ndarray"]} ndarray = "0.15.0" rustfft = "6.1.0" -
The source code to receive samples is below. You will need to copy this into your rust source code directory:
use ndarray::Array;
use num_complex::Complex;
use plotly::common::Title;
use plotly::layout::{Axis, GridPattern, Layout, LayoutGrid};
use plotly::{Plot, Scatter};
use rustfft::FftPlanner;
use soapysdr::Direction::Rx;

fn main() {
    // Data transfer settings
    let rx_chan = 0; // RX1 = 0, RX2 = 1
    let N: usize = 16384; // Number of complex samples per transfer
    let fs = 31.25e6; // Radio sample Rate
    let freq = 2.4e9; // LO tuning frequency in Hz
    let use_agc: bool = false; // Use or don't use the AGC
    let timeout_us: i64 = 5_000_000;
    let rx_bits = 16; // The AIR-T's ADC is 16 bits

    // Setup Device
    let dev = soapysdr::Device::new("driver=SoapyAIRT").expect("failed to open device");

    // Set Sample Rate
    dev.set_sample_rate(Rx, rx_chan, fs)
        .expect("failed to set sample rate");

    // Check Sample Rate
    let sample_rate: Result<f64, soapysdr::Error> = dev.sample_rate(Rx, rx_chan);
    println!("Sample rate set to: {}", sample_rate.unwrap());

    // Set Gain Mode
    dev.set_gain_mode(Rx, rx_chan, use_agc)
        .expect("failed to set gain mode");

    // Set Frequency
    dev.set_frequency(Rx, rx_chan, freq, ())
        .expect("failed to set frequency");

    // Create data buffer and start streaming samples to it
    let mut rx_stream = dev.rx_stream::<Complex<f32>>(&[rx_chan]).unwrap();

    //Create complex array of length N
    let mut rx_buff = vec![Complex::new(0., 0.); N];

    // Activate Stream
    rx_stream.activate(None).expect("failed to activate stream");

    // Read Samples
    let rt = rx_stream
        .read(&[&mut rx_buff[..]], timeout_us)
        .expect("read failed");

    // Deactivate Stream
    rx_stream.deactivate(None).expect("failed to deactivate");
    println!("Length of the array read: {rt}");

    //Plot Data

    // Split real vs imag and normalize [-1, 1]
    let n = 2.0_f32.powi(rx_bits - 1);
    let r_real: Vec<f32> = rx_buff.iter().map(|v| v.re / n).collect();
    let r_imag: Vec<f32> = rx_buff.iter().map(|v| v.im / n).collect();

    // FFT
    let mut planner = FftPlanner::<f32>::new();
    let fft = planner.plan_fft_forward(N);
    fft.process(&mut rx_buff);
    let mut fft_vals: Vec<f32> = rx_buff.iter().map(|v| 20. * (v.norm()).log(10.)).collect();
    // Shift Array
    fft_vals.rotate_right(N / 2);

    // create time and freq arrays
    let num_samp = N as f64;
    let time_us = Array::range(0., num_samp, 1.) / fs / 1e6;
    let f_ghz = (freq + (Array::range(0., fs, fs / num_samp) - (fs / 2.) + (fs / num_samp))) / 1e9;

    // Setup Plots
    let mut plot = Plot::new();
    let layout = Layout::new()
        .grid(
            LayoutGrid::new()
                .rows(2)
                .columns(1)
                .pattern(GridPattern::Independent),
        )
        .y_axis(Axis::new().title(Title::new("Amplitude")))
        .x_axis(Axis::new().title(Title::new("Time")))
        .y_axis2(Axis::new().title(Title::new("Amplitude (dBFS)")))
        .x_axis2(Axis::new().title(Title::new("Frequency (GHz)")));
    plot.set_layout(layout);
    // Plot I/Q
    let trace_re = Scatter::new(time_us.to_vec(), r_real)
        .name("Real")
        .x_axis("x1")
        .y_axis("y1");
    let trace_im = Scatter::new(time_us.to_vec(), r_imag)
        .name("Imag")
        .x_axis("x1")
        .y_axis("y1");
    plot.add_trace(trace_re);
    plot.add_trace(trace_im);

    // FFT Plot
    let trace_fft = Scatter::new(f_ghz.to_vec(), fft_vals)
        .name("FFT")
        .x_axis("x2")
        .y_axis("y2");
    plot.add_trace(trace_fft);
    plot.show();
}
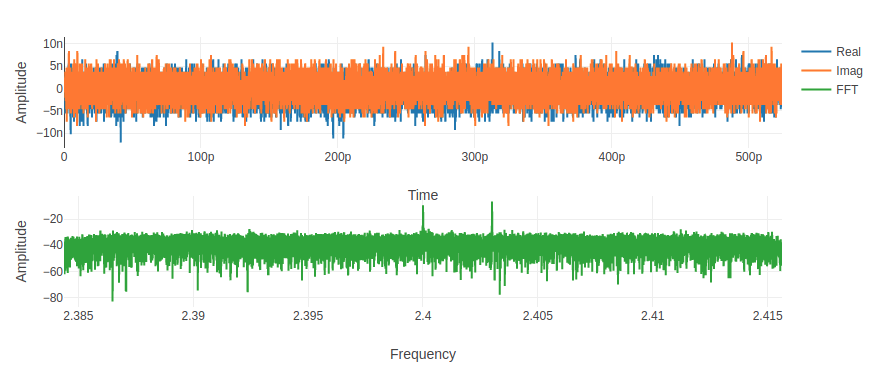
Output Plot