AirStack Operating System Installation
This documentation is written for the latest version of AirStack. For flashing older versions of AirStack (v0.4.x and earlier), please see these instructions.
This procedure is used to flash the AirStack software suite (Jetson Image) on the AIR-T. This image contains both the underlying operating system for the Jetson module as well as drivers and board support for the hardware interfaces present on the AIR-T. Flashing an AirStack image will restore your AIR-T's software to factory settings and delete all user data.
If you do not want to erase the contents of your AIR-T and just want to update an existing installation of AirStack, see the process for an AirStack Upgrade. Note that this may not be possible for all AirStack releases.
NOTE: IF YOU ARE HAVING ISSUES FLASHING YOUR AIR-T, PLEASE TAKE A LOOK AT OUR AIRSTACK INSTALLATION FAQ.
Prerequisites
To flash the AIR-T you will need:
- An x86 host machine running Linux or Windows Subsystem for Linux 2 (WSL2)
- This procedure was tested using Ubuntu 20.04 LTS, although Ubuntu 18.04 and later will work, as will many other Linux distributions.
- For instructions on setting up WSL2 for programming the AIR-T, see the WSL for Flashing AirStack section below.
- An AIR-T
- Keyboard, mouse, and monitor plugged into the AIR-T
- Micro USB cable
- AirStack software downloaded from the Developer Portal at www.deepwavedigital.com
Important Compatibility Note
Using the AirStack flashing utilities requires that Python 3 is available on your system. Supported versions of Python are 3.6 to 3.8 (Python 3.9+ is incompatible and the tool will print an error message if you attempt to use an unsupported version).
If python is not available on your host computer, you'll see errors similar to the following when executing Step #7 of the AirStack Installation Procedure:
[ 0.043 ] /usr/bin/env: 'python': No such file or directory
AirStack Installation Procedure
NOTE: FLASHING THE AIR-T WILL ERASE EVERYTHING ON THE OPERATING SYSTEM. MAKE SURE THAT YOU HAVE A GOOD BACKUP OF ANYTHING YOU NEED PRIOR TO PERFORMING THIS PROCEDURE
The AirStack image is flashed using the NVIDIA tools with a custom OS image and AIR-T drivers. Follow these steps to flash the AIR-T software:
1. Install the Prerequisites (see above) on the host computer.
2. Make sure that you have a proper backup of any personal code or files from the AIR-T.
3. As shown in Figure 1, connect the micro USB port (J20) from the AIR-T to the Linux host. If the AIR-T is in its enclosure, connect the micro USB cable to the port labeled USB on the back.
4. Boot the AIR-T into recovery mode. See the section below for instructions.
5. On the Linux host, open a terminal by entering ctrl + shift + T on the keyboard.
6. Go to the directory in which AirStack was downloaded. For example, if the software was downloaded to your Downloads folder, enter the following commands in a command shell:
cd ~/Downloads
tar -xzvf deepwave_airstack_software_<VERSION>.tgz
cd deepwave_airstack_software
<VERSION> is replaced with the version you downloaded. 7. Flash the AIR-T with AirStack by entering one of the following commands, depending on your AIR-T product:
- Embedded Series (AIR7101 and AIR7201)
airt_flash/scripts/flash-systemimg.py -b ./Linux_for_Tegra --brd jetson-tx2
- Edge Series (AIR8201)
airt_flash/scripts/flash-systemimg.py -b ./Linux_for_Tegra --brd jetson-tx2i
The procedure can take up to 15 minutes depending on the speed of your host. The AIR-T will automatically boot once the procedure is complete.
8. When the AIR-T boots, you will be prompted to create a user on the AIR-T. Follow the on-screen instructions and the AIR-T will reboot once this step has completed. Some AirStack versions may prompt to "Select Nvpmodel Mode". If you see this screen choose MAXN_CORE_ARM - (Default). The system will reboot once it has taken a few minutes to configure.
9. Flash the firmware. If not already done, the AIR-T must have the corresponding version of the AirStack firmware installed on the FPGA. Note that flashing the AirStack OS does not install the new FPGA firmware; however, we do include the new firmware image under lib/firmware in AirStack on the freshly imaged AIR-T. The installation instructions may be found in the Firmware Flash Procedure section of the Deepwave documentation.
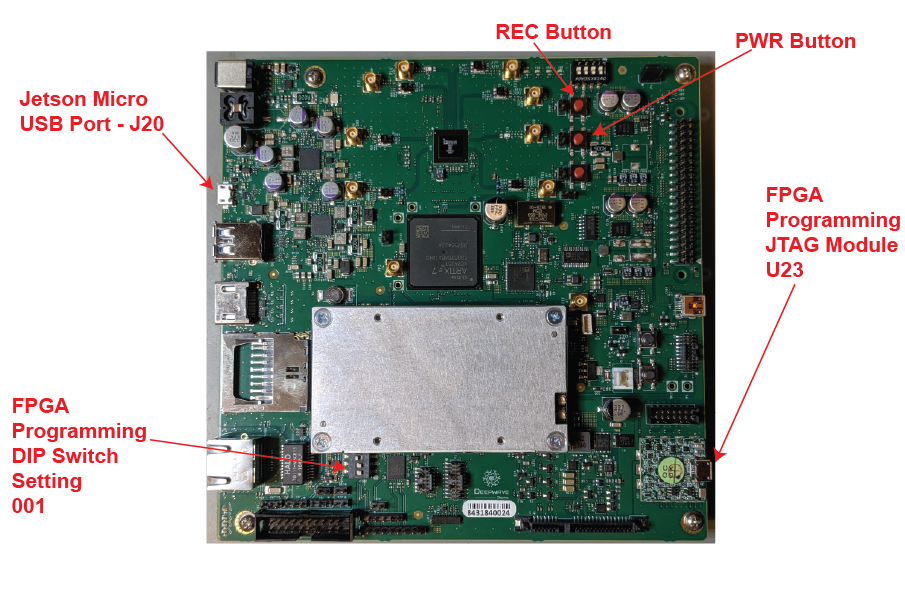
Figure 1: Image of the AIR-T and the relevant interfaces highlighted.
Placing the AIR-T Into Recovery Mode
To place the AIR-T into recovery mode, follow this procedure. Note that you must be in a fresh recovery mode to flash the AIR-T (before each time the flash command is executed, the system must be power cycled into recovery mode).
Using Software Utility (Preferred)
AirStack 0.3 and later contain a small software executable, reboot_to_recovery, that functions like the normal reboot command from a terminal but directs the AIR-T to enter recovery mode on next system boot.
When the micro-USB is connected from the AIR-T to the host computer, and the AIR-T is not in recovery mode, the USB cable will function as a network connection with the IP addresses displayed in the table below. In this configuration, the AIR-T may be logged in to via ssh from the Linux host. When the AIR-T is in recovery mode, this IP interface does not exist.
| System | IP Address |
|---|---|
| Linux host | 192.168.55.100 |
| AIR-T | 192.168.55.1 |
When logged in to the AIR-T, enter the following command in a terminal window on the AIR-T:
$ reboot_to_recovery
Administrative permissions are required to execute the reboot_to_recovery command, so a normal user will need to run sudo reboot_to_recovery. The board will immediately reboot and come up in recovery mode.
On the host, verify that the device is in recovery mode and communicating with your computer. See this section for details: Verification of Recovery Mode
Using Hardware Buttons
An AIR-T can be placed into recovery mode by using a set of buttons on the board itself. The basic procedure is to reset the board while holding the recovery button. This allows you to recover the unit even if the operating system has been completely wiped.
-
Locate the reset (
RST) and recover (REC) buttons on the AIR-T:- AIR7101 and AIR7201: If the AIR-T is in its enclosure, remove the cover to get access to the top of the board. Locate the red buttons on the board labeled
RSTandREC. - AIR8201-B: Use the buttons labeled
resetandrecoveron the front panel.
- AIR7101 and AIR7201: If the AIR-T is in its enclosure, remove the cover to get access to the top of the board. Locate the red buttons on the board labeled
-
Connect the AIR-T to the host computer using the micro USB cable.
-
Press and hold the
recoverbutton. -
While holding the
recoverbutton, press and release theresetbutton to reset the board. -
Release the
recoverbutton after 2 seconds. -
On the host connected to the AIR-T via USB, verify that the device is in recovery mode and communicating with your computer using the procedure in the Verification of Recovery Mode section below.
Verification of Recovery Mode
To verify that your device is in recovery mode, you will use the output of the lsusb command from the host computer when the AIR-T is connected via the micro-usb and powered on. Here is an example for the AIR7101:
$ lsusb
Bus 003 Device 013: ID 0955:7c18 NVidia Corp.
On the host computer, open a terminal and type lsusb, which should show a device with a description of "NVidia Corp." When looking at the hexadecimal numbers that are returned, the format is VENDOR_ID:PRODUCT_ID. You can determine the mode of the micro-usb interface (Recover or Network Mode) based on the PRODUCT_ID. If you are in recovery mode, you will see the PRODUCT_ID equal to the value in column 2 of the table below for your AIR-T model.
| AIR-T Model | PRODUCT_ID (Recovery Mode) | PRODUCT_ID (Network Mode) |
|---|---|---|
| AIR7101 | 0955:7c18 | 0955:7020 |
| AIR7201 | 0955:7c18 | 0955:7020 |
| AIR8201 | 0955:7018 | 0955:7020 |
WSL for Flashing AirStack
The following was tested on Windows 11 using Windows Subsystem for Linux 2 (WSL2). One very important note is that the AIR-T's micro USB connection will disconnect and reconnect repeatedly during the flashing process. In order to allow Windows to automatically pass the micro USB connection to WSL2, you must follow these instructions exactly.
-
Install WSL2 by opening a PowerShell (as Administrator) and typing the following:
wsl --install -
Install Ubuntu 20.04:
wsl --install -d Ubuntu-20.04 -
Follow the instructions from Microsoft to install the Windows USB tools for your WSL2 instance: Connect USB devices.
- Note 1: You must be running Linux kernel 5.10.60.1 or later which may require you to upgrade your Linux kernel. You can see your Linux kernel version by typing
uname -r. To update the Linux kernel, use thewsl --updatecommand from a Powershell terminal and then shutdown (wsl --shutdown) and then starting the WSL2 instance. - Note 1: You must install
usbipd-win 2.3+which is the first release that incorporates the--auto-attachfeature.
- Note 1: You must be running Linux kernel 5.10.60.1 or later which may require you to upgrade your Linux kernel. You can see your Linux kernel version by typing
-
Install the Linux distribution USB tools using the following instructions: WSL setup for USB/IP client tools
-
Connect the AIR-T to the WSL2 instance:
- Make sure that the Ubuntu instance is running (as an Administrator) and a terminal is opened.
- Plug the micro-USB from the AIR-T into the computer and place the AIR-T into recovery mode.
- Open a PowerShell terminal (as an Administrator) and type the following to see the USB devices: The devices with the
C:\Users\deepwave> usbipd wsl list BUSID VID:PID DEVICE STATE 1-2 0955:7c18 APX Not attached0955:7c18ID is the AIR-T in recovery mode. - In the PowerShell, connect the USB device to the WSL2 instance replacing the
<busid>variable with the value for the AIR-T. In the above example, that would be1-2:NOTE: The AIR-T will disconnect and reconnect multiple times during the flashing procedure, so you must use theC:\Users\deepwave> usbipd wsl attach --busid <busid> --auto-attach--auto-attachoption. - You should now be able to view the AIR-T in the Ubuntu terminal:
deepwave@wsl2-ubuntu:~$ lsusb Bus 002 Device 001: ID 1d6b:0003 Linux Foundation 3.0 root hub Bus 001 Device 002: ID 0955:7c18 NVIDIA Corp. APX Bus 001 Device 001: ID 1d6b:0002 Linux Foundation 2.0 root hub - Now you should be able to follow the AirStack Installation Procedure above (in the Ubuntu terminal), starting with Step 6. If you downloaded the AirStack software to your Windows home directory, that should be mounted in the
/mnt/clocation in Linux.