Firmware Recovery Method
Programming the AIR-T's flash memory with a faulty FPGA image could prevent the use of the load_flash utility for reprogramming the flash device. The following method will restore memory with an image that allows the use of the load_flash utility for normal reprogramming. Note that, once this procedure is complete, the FPGA's flash memory will ONLY contain a recovery image. It will NOT contain any firmware for normal SDR operation. Additional programming with load_flash will be necessary to install an image that allows SDR operation.
Prerequisites
To flash the firmware on the AIR-T you will need:
- A host machine running Linux*
- An AIR-T
firmware_recovery.tar.gzdownloaded from the Developer Portal at www.deepwavedigital.com-
A Micro USB cable
-
It is possible to flash the AIR-T firmware with Vivado on any operating system supported by Vivado, however this bash script only runs on Linux.*
Linux Host Machine Requirements
We recommend running Ubuntu 16.04+ with the software outlined below installed.
Vivado for Linux
To flash the FPGA on the AIR-T, Vivado is currently required to be installed on the host. You may install full Vivado if you will be developing FPGA code. If you are just using Vivado to flash the FPGA, we recommend installing the lighter version, Vivado Lab Edition:
The flash_firmware install script will look for the Vivado Lab executable in:
/opt/Xilinx/Vivado_Lab/2017.4/bin/vivado_lab
which is the default installation location. If you choose to install Vivado in a different location, you must let the script know by passing the -v parameter.
Digilent JTAG Drivers for Linux
This is the driver for Linux to communicate with the USB JTAG module on the AIR-T. To set this up, install the following drivers on the host:
AIR-T Hardware Connections
USB to USB Micro Cable
The FPGA on the AIR-T requires a USB connection to the host from the JTAG module (U23). If the AIR-T is in its enclosure, you will need to remove the cover to get access to the JTAG module. If you are having trouble plugging in the USB micro cable to U23, you may either remove the board from the enclosure or use an angled USB micro cable, shown as the StarTech 90 degree Micro USB Cable - A to Down Angle Micro B.
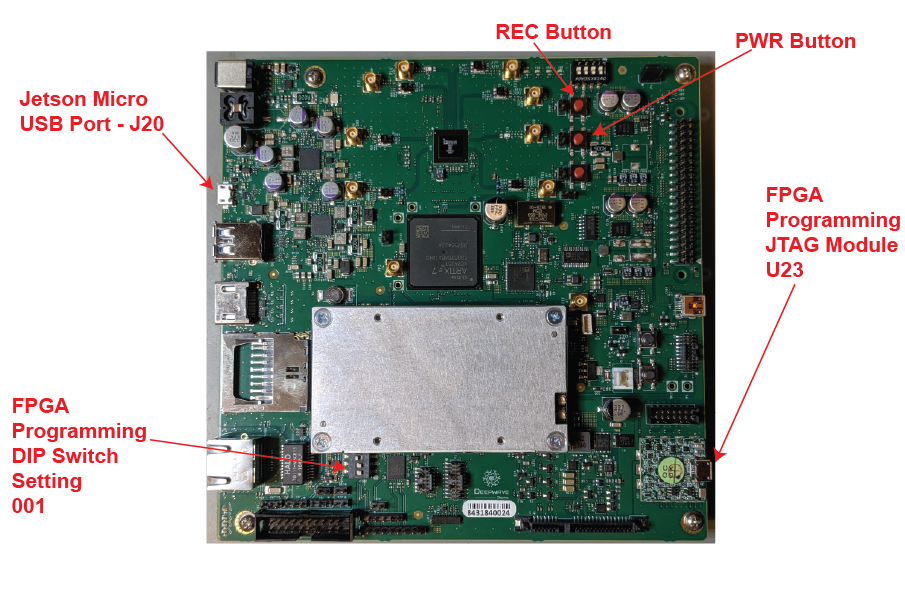
Figure 1: Image of the AIR-T and the relevant interfaces highlighted.
Firmware Flashing Utility
The flash_firmware script has a help menu that defines the input commands:
$ ./flash_firmware -h
This script will flash the firmware on the AIR-T.
Author: Deepwave Digital, Inc.

Usage: sudo ./flash_firmware [options]
Program Options:
  -h              Display this help message
  -a [path]       Path to AirStack files
  -v [file]       Vivado / Vivado Lab executable
Note: if you have installed Vivado in a non-default location, you must pass the location to the script using the -v option.
Firmware Flashing Procedure
- Install Required software on the host computer
-
On the host computer extract the
firmware_recovery.tar.gzarchive containing theflash_firmwarescript:$ tar xvf firmware_recovery.tar.gz -
Set the FPGA Programming DIP Switch to 001 as shown in the image
- Connect a USB cable between the host and the FPGA Programming JTAG Module - U23 as shown in Figure 1.
- Boot the AIR-T so that power is provided to the FPGA.
-
Run the
flash_firmwarescript on the host machine:$ sudo ./flash_firmware -a <HARDWARE_VERSION>where the HARDWARE_VERSION is the subfolder that is relevant to your AIR-T hardware.
-
You should now be able to run the
load_flashbased steps from the "Firmware Installation" procedure above.